In a previous post I described my last stained glass project, a rendering of my antique hand plane. In that post I only touched on some of the techniques that I used to create the stained glass panel. This time, I've taken more photographs and will explain in more detail how this project will come together.
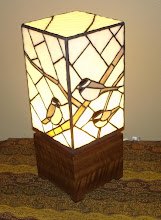
So, what is the new project? My new project is a lamp. Notice, I didn't say lampshade. There are plenty of stained glass lampshades out there. They are attractive and many are complementary with Arts & Crafts design. But this lamp is altogether different from anything I had seen before. You'll see what I mean as the lamp comes together.
Before I get ahead of myself, let me give credit where credit is due. The original piece that inspired this project was created by an extremely talented glass artist named Ichiro Tashiro of Japan. I borrowed heavily from Mr. Tashiro's work in the making of this lamp.
Let's start with the images. This lamp has four glass sides and a glass top. The glass portion will sit snugly in a wooden base. The four glass sides will have images. In this case I chose birds.


These are black-capped chickadees. I chose them for this project because they are common all across the northern part of the United States, and because they are active and cute.
Using a common ink-jet printer, I sized and printed black and white versions of these photographs. Now is a good time to talk about size. I had already decided how large the lamp and its base was going to be. In this case, I wanted each panel to be 6 inches wide. I also wanted the wooden base to be a square of 6 inches. Using the "golden rectangle" ratio of 1:1.6, I made the glass panel height 9.75 inches. (6 x 1.6 = 9.6) OK. So I rounded up a little on the math. It will look fine, trust me.
After figuring out the specific dimensions for each glass panel I determined how large the birds should be for a pleasing design. I also chose which direction the birds would face and the layout of the branches. Only two sides of a square object can be see at one time (I'm not counting the top as a side.) Therefore, only two sides of the lamp will have a detailed image of birds. The other two sides will probably face a wall, much like I did when I misbehaved in kindergarten.
Using expert drafting equipment of a ruler, a pencil, a carpenter's square, and a sheet of paper, I was able to lay out the 6 x 9.75 inch panels. From the black and white prints I traced pencil outlines of the birds' prominent features and the twigs they are perched upon.

After making the simple pencil sketch, I went over the drawing another time with a pencil and ruler, making my lines straight. I thought the panel would look better that way. You be the judge.


No comments:
Post a Comment