Wednesday, February 10, 2010

Men's Valet


When I came home from work, I would pull out my wallet and take off my watch and lay them on the kitchen counter. My wife wasn't too keen on the idea, so they ended up in a drawer, mixed in with paper clips, rubber bands and postage stamps. I wasn't too keen on that idea.


So here is the solution. This box is sturdily built with keyed miter joints and a thick brass pin to act as a hinge for the lid. The edges are rounded and the finish is very smooth. The profile is low enough that I could put it into a dresser drawer if it needed to be out of sight. It's pretty enough that it gets to stay out on the counter.


This one is mahogany. The keys in the corners are rosewood. The bottoms are lined with leather.
The finish is hand-rubbed oil and wax.

Let me know if you like them.

-Evan

Friday, January 1, 2010

Hollywood Chisel Box?

A very well-known Hollywood celebrity was about to receive a set of woodworking chisels (made by Blue Spruce Toolworks) for his birthday. The giver decided he needed a nice box to go along with the chisels. I happily agreed to build it. This is the result.


The sides are western walnut and the sliding top is birds-eye maple. The joinery is keyed miters. The contrasting keys are also maple.


The lid is mitered so that it is hidden when the lid is closed. I wish I had taken the time for better photos to show off this feature.


With the lid removed you can see the maple tray. Just in case the new owner wants to store something other that chisels, I made the tray removable.

The finish is hand-rubbed tung oil and wax. It turned out very smooth to the touch and the figure in the maple is really pretty.

Friday, May 1, 2009

I've fallen into a pattern.


So, here is the pattern beside my work area. I've numbered everything to avoid confusion later.


The first panel is almost completed foiled. (I must grind for a perfect fit.)


Here are some of the tools I use for copper foiling. Black-backed adhesive copper foil (1.25mm x 7/32".), some good scissors, an oil-based permanent marker and my "foil finisher". The work surface is 3/4" plywood scrap. Notice how the glass parts must fit together inside the template area. If I don't keep each panel exactly the same size I could end up with crooked lamps. That just won't work!


Here's the finished product. I have to say, I like this one better than the first. I was in a rush to finish the base because I entered both lamps into an art show (non-juried). My wood selection at the time was poplar or nothing. So I chose poplar! Most home centers have lumber sections where you can buy pine, fir, red oak and poplar already "surfaced" and ready for your project. I had some leftover poplar from a previous project and it did the job.

Saturday, March 21, 2009

All the leaves are gone.

The Chickadee Light Box was my third stained glass project and my first attempt at a lamp. It turned out better than I could have imagined. I love to turn on the light and just sit in the room with it glowing in the corner. (Maybe that's a little weird, I admit. But the soft light is peaceful.) The chickadees happily guard the entry of my house.

I've basked in the glory of my first successful lamp long enough. I figure that it's time to get on with the next one. I had the idea for a fall leaves lamp at the same time as the chickadees design. (Again, thank you to Ichiro Tashiro for his inspiring work.) So last fall, I wandered around my yard and took some snapshots of my maple trees.


I first thought a "realistic" leaf was the way to go. But as I studied the outlines of "real" leaves, I thought better of it real quick. There are a lot of curves and overlapping parts. I know my limitations. My stained glass experience was not up to the task of creating 6-8 realistic leaves. Especially when I'm building a complicated three-dimensional lamp.

Instead, I traced the outline of a leaf photo that I liked and made a posterboard cut-out of it. I actually made three identical cut-outs.

Once I drew the borders of the lamp panel (6" x 9") I played around with the placement of the leaves. When I was happy, I traced around the leaf cutouts and moved on to the next panel of the lamp. All the while I'm thinking about how the glass will cut and grind. I could easily design myself into a corner, making pieces that would be very difficult to reproduce.

As you can see, the first panel is completed. I'm taking cues from panel #1 to design panel #2. These panels will make one corner of the lamp. On the fly, I decided to take curves out of the design. Instead, I've gone over the leaf tracings with a ruler to straighten every curve.

Now all four panels are designed and labeled. I will photocopy them for safekeeping. My next step is to transfer each panel design to poster board. I will then number and cut out all the pieces using my foiling shears.

Tuesday, March 17, 2009

I figured wood would work.


This is a chunk of figured Western Walnut. Eventually, it will be the base for the lamp.I picked this up from the scrap bin of a local gun stock blank sawyer.
In its raw form, it is about 30" long x 3" high x 2.5" wide. I need to make a box that is 6" wide x 6" high x 3/4" thick. So I'm going to resaw this board and glue it together to make a bookmatch.


I used my table saw to cut it apart. You can see the burn marks from the blade. I would rather have used a bandsaw for this operation. The bandsaw would have made a cleaner cut and its thin blade would not have wasted so much material. Unfortunately, I do not have a bandsaw.
After I scraped away the dried glue I ran the board through my thickness planer until it was the proper thickness. I am going for a thickness of 3/4".


I need a useable 24" of length that is at least 6" wide. This board barely gave those dimensions to me. Close enough! Here you can see the figure of the walnut. This is raw wood. When I add the finish, the figure should really POP!


I have now cut the board down to its final dimensions and cut the miters. Each board is 6" long, but only 5" high. I cut off some extra height in order to made the colors and figure of the board look more balanced. Next, I will cut grooves into the inside face of the boards. One groove will hold a plywood bottom. The other groove will hold the lamp.


Here is the plywood bottom. It is 3/4" baltic birch plywood. Now, you may be asking me, "Isn't 3/4" plywood a bit thick for a simple project like a lamp?". To that I would say, "Yes". But do you see that hole in the middle of the board? That is the hole that holds the lamp socket. For the lamp socket to properly seat and then stay put, a thick board is necessary. I did cut a rabbet around the edges of the plywood so that I could keep the groove in the walnut base to a minimum. The groove is 1/4" wide and 1/4" deep.


Here you can see all of the grooves and the plywood bottom ready for glue-up. I've already sanded each piece with 150 and 220 grit sandpaper.


Gluing up a mitered box is easier to do with masking tape than regular wood clamps. Here you can look into the top of the box where the groove will hold the brass base of the lamp. The groove is 1/4" wide and approx. 1-1/2" deep.


OOPS! I decided that the wood base needed "feet". So I set up my router table and proceeded to remove the wood I no longer wanted. My mistake was feeding the wood into the router bit to aggressively. I ended up splintering the wood on two of the feet. Of course, the splinters (they were chunks!) were long gone when I realized what I had done. So there was no hope of just gluing the broken pieces back in place. The pieces that broke off left a void that was approx. 1/4" wide x 1/4" long x 1/16" deep. I had to fill the void with something.
A crusty old woodworker friend of mine taught me this trick. First, get some fine sawdust from a scrap of the project (walnut in this case). My random-orbit sander had some in the dust catcher. Pile up a small mound of saw dust and add cyanoacrylate glue (super-glue) and mix together until it forms a paste. Your going for the consistency of peanut butter. But don't sweat it too much, just make sure you can spread it. Get a scrap of wood and spread the brown mixture directly into the void. Make sure to use more than you need. And don't worry about perfect application. You will be able to sand away the excess after it dries.


A splotchy looking repair. Ready for final sanding!


Here is the box right after the first coat of Danish oil. I started with medium walnut color to hopefully bring out the figured grain. (I think it looks pretty sharp right now!) Later coats were tung oil. After it was completely dry, I gave it a final sanding with 600 grit wet-dry paper and rubbed on a coat of furniture wax.


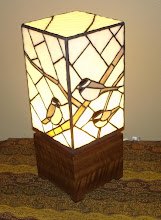
And here it is! This was a really challenging project! But the result was worth it and I can't wait to start my next version of this fantastic lamp.

Sunday, November 23, 2008

Tuning up the brass section.


I picked up these brass parts at a local hobby shop. They are .016 inches thick x 12 inches long. The large set is two inches wide; the small set is one inch. These pieces will make the metal part of the base that fits into the wooden base. Clear as mud, right?


I carefully cut two of the one-inch brass pieces into six inch lengths.


After cleaning them up with 150 grit sandpaper, I will add the tinning. (I don't know if I'm saying this right. All I'm going to do is cover the pieces with a thin coat of solder.)


First brass piece, partially tinned.


Here are all four brass pieces completely covered in solder and ready to apply to the lamp.


I am now about to solder the first two brass parts to the botton of the lamp. This section of brass will eventually make a sturdy base that will easily support the weight of the glass lamp.


The second pair of one-inch brass parts overlap the first. I will solder them all together. The solder lines that connect the brass parts to each other will not be noticed once the lamp is assembled. However, the solder lines where the brass and the lamp connect will be noticeable. Keep them nice and tidy. (But don't look to closely at mine!)


This section of brass pictured above (I call it the "slip") will eventually slide into a rabbet cut into the wooden base. It will provide stability for the heavy glass but it must be fitted precisely.

After cleaning them up with 150 grit sandpaper, I took two of the twelve-inch long and two-inch wide parts and bent them in my vise. I bent each piece so that it would have two five-inch long sides and one two-inch long side. It looked like an unfinished "U" when it was all said and done.

These two pieces are "clamped" together with paper clips and centered so that there is 1/2 of an inch showing all around. I soldered the two matching pieces together. Then I tinned the upper half of the "slip" and soldered it into place.


Next time I will start on the wooden base. I have some really nice figured Walnut that I salvaged from becoming firewood!

Friday, November 21, 2008

Light cube squared.


The four sides come together at last!

I'm jazzed that I finally get to see these panels become a three-dimensional object!

The trick here is in lining up the panels to make a corner. You don't want to overlap one panel over another. That would change the dimensions of the box and might make it go out of square.

Each side that comes together to make the corner should come together equally. When it is done correctly, there will be a small square gap running the full length of the outside of the corner. That gap will be filled with a piece of copper wire.


This jig was vital for keeping the box square while I soldered. The "V" shape on the jig is 90-degrees, or "square."

Also, solder likes to run downhill when it is hot. So this jig was critical to making a decent solder bead on the outside corner.

The first panels I soldered together standing up. I tacked solder and the copper wire in about four or five places along the outside corder. I held them square with the help of my project board. After that I was able to place them in the jig above to solder the inside corner.


Here's the inside corner of two panels shown while still in the jig and after soldering.


Now you can see the outside corner and the copper wire that fills the gap.


My hands were a little shaky and I kept spilling hot solder down the sides of the panels. (Too much coffee!) This extra poster board helped keep the solder from sticking to the finished panels. (It's no fun having to re-solder an already finished panel!) However, the flux tended to render the blue tape un-sticky after awhile. This is probably the third strip of tape for this particular piece of paper. Perserverance pays!


It's starting to look like something! I'm now going to quickly cut out a pattern for the lid. I will cut the glass, copper foil the pieces and solder them into place.

At this point I really getting excited. I want to see what it looks like lit up! I haven't yet acquired the socket and cordset for the lamp works so I need to come up with something else. It needs to be compact and bright....a mini-flashlight! I bought these for my kids last Christmas. Here's what it looks like lit.


I like it! The white parts look like snow, the birds look properly colored, and it's just cool to look at!
The blue cast to the light is because of the color of the LED in the flashlight. I'll be using a different color bulb when it's all said and done.
Seeing it lit really energizes me. I still need to build the wooden base and the brass support structure, but now I'm really motivated!