
The four sides come together at last!
I'm jazzed that I finally get to see these panels become a three-dimensional object!
The trick here is in lining up the panels to make a corner. You don't want to overlap one panel over another. That would change the dimensions of the box and might make it go out of square.
Each side that comes together to make the corner should come together equally. When it is done correctly, there will be a small square gap running the full length of the outside of the corner. That gap will be filled with a piece of copper wire.

This jig was vital for keeping the box square while I soldered. The "V" shape on the jig is 90-degrees, or "square."

This jig was vital for keeping the box square while I soldered. The "V" shape on the jig is 90-degrees, or "square."
Also, solder likes to run downhill when it is hot. So this jig was critical to making a decent solder bead on the outside corner.
The first panels I soldered together standing up. I tacked solder and the copper wire in about four or five places along the outside corder. I held them square with the help of my project board. After that I was able to place them in the jig above to solder the inside corner.

Here's the inside corner of two panels shown while still in the jig and after soldering.

Now you can see the outside corner and the copper wire that fills the gap.

My hands were a little shaky and I kept spilling hot solder down the sides of the panels. (Too much coffee!) This extra poster board helped keep the solder from sticking to the finished panels. (It's no fun having to re-solder an already finished panel!) However, the flux tended to render the blue tape un-sticky after awhile. This is probably the third strip of tape for this particular piece of paper. Perserverance pays!

It's starting to look like something! I'm now going to quickly cut out a pattern for the lid. I will cut the glass, copper foil the pieces and solder them into place.

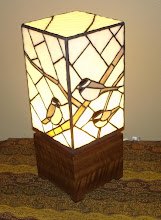
At this point I really getting excited. I want to see what it looks like lit up! I haven't yet acquired the socket and cordset for the lamp works so I need to come up with something else. It needs to be compact and bright....a mini-flashlight! I bought these for my kids last Christmas. Here's what it looks like lit.

I like it! The white parts look like snow, the birds look properly colored, and it's just cool to look at!
The blue cast to the light is because of the color of the LED in the flashlight. I'll be using a different color bulb when it's all said and done.
Seeing it lit really energizes me. I still need to build the wooden base and the brass support structure, but now I'm really motivated!

No comments:
Post a Comment