Showing posts with label wood. Show all posts

Wednesday, February 10, 2010

Men's Valet


When I came home from work, I would pull out my wallet and take off my watch and lay them on the kitchen counter. My wife wasn't too keen on the idea, so they ended up in a drawer, mixed in with paper clips, rubber bands and postage stamps. I wasn't too keen on that idea.


So here is the solution. This box is sturdily built with keyed miter joints and a thick brass pin to act as a hinge for the lid. The edges are rounded and the finish is very smooth. The profile is low enough that I could put it into a dresser drawer if it needed to be out of sight. It's pretty enough that it gets to stay out on the counter.


This one is mahogany. The keys in the corners are rosewood. The bottoms are lined with leather.
The finish is hand-rubbed oil and wax.

Let me know if you like them.

-Evan

Friday, May 1, 2009

I've fallen into a pattern.


So, here is the pattern beside my work area. I've numbered everything to avoid confusion later.


The first panel is almost completed foiled. (I must grind for a perfect fit.)


Here are some of the tools I use for copper foiling. Black-backed adhesive copper foil (1.25mm x 7/32".), some good scissors, an oil-based permanent marker and my "foil finisher". The work surface is 3/4" plywood scrap. Notice how the glass parts must fit together inside the template area. If I don't keep each panel exactly the same size I could end up with crooked lamps. That just won't work!


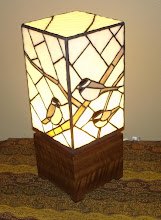
Here's the finished product. I have to say, I like this one better than the first. I was in a rush to finish the base because I entered both lamps into an art show (non-juried). My wood selection at the time was poplar or nothing. So I chose poplar! Most home centers have lumber sections where you can buy pine, fir, red oak and poplar already "surfaced" and ready for your project. I had some leftover poplar from a previous project and it did the job.

Friday, November 21, 2008

Light cube squared.


The four sides come together at last!

I'm jazzed that I finally get to see these panels become a three-dimensional object!

The trick here is in lining up the panels to make a corner. You don't want to overlap one panel over another. That would change the dimensions of the box and might make it go out of square.

Each side that comes together to make the corner should come together equally. When it is done correctly, there will be a small square gap running the full length of the outside of the corner. That gap will be filled with a piece of copper wire.


This jig was vital for keeping the box square while I soldered. The "V" shape on the jig is 90-degrees, or "square."

Also, solder likes to run downhill when it is hot. So this jig was critical to making a decent solder bead on the outside corner.

The first panels I soldered together standing up. I tacked solder and the copper wire in about four or five places along the outside corder. I held them square with the help of my project board. After that I was able to place them in the jig above to solder the inside corner.


Here's the inside corner of two panels shown while still in the jig and after soldering.


Now you can see the outside corner and the copper wire that fills the gap.


My hands were a little shaky and I kept spilling hot solder down the sides of the panels. (Too much coffee!) This extra poster board helped keep the solder from sticking to the finished panels. (It's no fun having to re-solder an already finished panel!) However, the flux tended to render the blue tape un-sticky after awhile. This is probably the third strip of tape for this particular piece of paper. Perserverance pays!


It's starting to look like something! I'm now going to quickly cut out a pattern for the lid. I will cut the glass, copper foil the pieces and solder them into place.

At this point I really getting excited. I want to see what it looks like lit up! I haven't yet acquired the socket and cordset for the lamp works so I need to come up with something else. It needs to be compact and bright....a mini-flashlight! I bought these for my kids last Christmas. Here's what it looks like lit.


I like it! The white parts look like snow, the birds look properly colored, and it's just cool to look at!
The blue cast to the light is because of the color of the LED in the flashlight. I'll be using a different color bulb when it's all said and done.
Seeing it lit really energizes me. I still need to build the wooden base and the brass support structure, but now I'm really motivated!

Friday, November 7, 2008

Scritch scratch I was making a lamp.

An unusual peace has descended upon the shop. The table saw has been quiet for several days now. There is still work being done. But replacing the saw's loud grumbling is a soft, gritty scratching noise. A sound that I can only describe as what a fistful of gravel would sound like when scraped across a chalkboard. Anyone who has ever cut glass will know the sound well.

In a previous post I described my last stained glass project, a rendering of my antique hand plane. In that post I only touched on some of the techniques that I used to create the stained glass panel. This time, I've taken more photographs and will explain in more detail how this project will come together.

So, what is the new project? My new project is a lamp. Notice, I didn't say lampshade. There are plenty of stained glass lampshades out there. They are attractive and many are complementary with Arts & Crafts design. But this lamp is altogether different from anything I had seen before. You'll see what I mean as the lamp comes together.

Before I get ahead of myself, let me give credit where credit is due. The original piece that inspired this project was created by an extremely talented glass artist named Ichiro Tashiro of Japan. I borrowed heavily from Mr. Tashiro's work in the making of this lamp.

Let's start with the images. This lamp has four glass sides and a glass top. The glass portion will sit snugly in a wooden base. The four glass sides will have images. In this case I chose birds.


These are black-capped chickadees. I chose them for this project because they are common all across the northern part of the United States, and because they are active and cute.

Using a common ink-jet printer, I sized and printed black and white versions of these photographs. Now is a good time to talk about size. I had already decided how large the lamp and its base was going to be. In this case, I wanted each panel to be 6 inches wide. I also wanted the wooden base to be a square of 6 inches. Using the "golden rectangle" ratio of 1:1.6, I made the glass panel height 9.75 inches. (6 x 1.6 = 9.6) OK. So I rounded up a little on the math. It will look fine, trust me.

After figuring out the specific dimensions for each glass panel I determined how large the birds should be for a pleasing design. I also chose which direction the birds would face and the layout of the branches. Only two sides of a square object can be see at one time (I'm not counting the top as a side.) Therefore, only two sides of the lamp will have a detailed image of birds. The other two sides will probably face a wall, much like I did when I misbehaved in kindergarten.

Using expert drafting equipment of a ruler, a pencil, a carpenter's square, and a sheet of paper, I was able to lay out the 6 x 9.75 inch panels. From the black and white prints I traced pencil outlines of the birds' prominent features and the twigs they are perched upon.


After making the simple pencil sketch, I went over the drawing another time with a pencil and ruler, making my lines straight. I thought the panel would look better that way. You be the judge.


Tuesday, November 4, 2008

Taking the path less travelled.

Welcome.

This blog is devoted to the work of my own hands guided by creativity and thought and inspired by nature and the work of great craftsmen. As I create I will photograph and video the progress so you can walk beside me in the shop.

The craftsmen who influence me are too many to mention, but most found their fame in the Arts & Crafts movement in the United States at the turn of the 20th century. The short list is Gustav Stickley, Charles Limbert, and Charles and Henry Greene. Of course, there is a notable exception in William Morris, who was British by birth and didn't live to see the 20th century. He died in 1896, but his ideas and actions influenced all those who followed.

Enough with the history lesson! Grab your tool belt and meet me at the workbench.