Showing posts with label glass. Show all posts

Friday, May 1, 2009

I've fallen into a pattern.


So, here is the pattern beside my work area. I've numbered everything to avoid confusion later.


The first panel is almost completed foiled. (I must grind for a perfect fit.)


Here are some of the tools I use for copper foiling. Black-backed adhesive copper foil (1.25mm x 7/32".), some good scissors, an oil-based permanent marker and my "foil finisher". The work surface is 3/4" plywood scrap. Notice how the glass parts must fit together inside the template area. If I don't keep each panel exactly the same size I could end up with crooked lamps. That just won't work!


Here's the finished product. I have to say, I like this one better than the first. I was in a rush to finish the base because I entered both lamps into an art show (non-juried). My wood selection at the time was poplar or nothing. So I chose poplar! Most home centers have lumber sections where you can buy pine, fir, red oak and poplar already "surfaced" and ready for your project. I had some leftover poplar from a previous project and it did the job.

Saturday, March 21, 2009

All the leaves are gone.

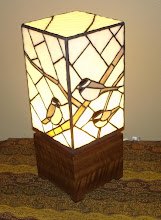
The Chickadee Light Box was my third stained glass project and my first attempt at a lamp. It turned out better than I could have imagined. I love to turn on the light and just sit in the room with it glowing in the corner. (Maybe that's a little weird, I admit. But the soft light is peaceful.) The chickadees happily guard the entry of my house.

I've basked in the glory of my first successful lamp long enough. I figure that it's time to get on with the next one. I had the idea for a fall leaves lamp at the same time as the chickadees design. (Again, thank you to Ichiro Tashiro for his inspiring work.) So last fall, I wandered around my yard and took some snapshots of my maple trees.


I first thought a "realistic" leaf was the way to go. But as I studied the outlines of "real" leaves, I thought better of it real quick. There are a lot of curves and overlapping parts. I know my limitations. My stained glass experience was not up to the task of creating 6-8 realistic leaves. Especially when I'm building a complicated three-dimensional lamp.

Instead, I traced the outline of a leaf photo that I liked and made a posterboard cut-out of it. I actually made three identical cut-outs.

Once I drew the borders of the lamp panel (6" x 9") I played around with the placement of the leaves. When I was happy, I traced around the leaf cutouts and moved on to the next panel of the lamp. All the while I'm thinking about how the glass will cut and grind. I could easily design myself into a corner, making pieces that would be very difficult to reproduce.

As you can see, the first panel is completed. I'm taking cues from panel #1 to design panel #2. These panels will make one corner of the lamp. On the fly, I decided to take curves out of the design. Instead, I've gone over the leaf tracings with a ruler to straighten every curve.

Now all four panels are designed and labeled. I will photocopy them for safekeeping. My next step is to transfer each panel design to poster board. I will then number and cut out all the pieces using my foiling shears.

Sunday, November 23, 2008

Tuning up the brass section.


I picked up these brass parts at a local hobby shop. They are .016 inches thick x 12 inches long. The large set is two inches wide; the small set is one inch. These pieces will make the metal part of the base that fits into the wooden base. Clear as mud, right?


I carefully cut two of the one-inch brass pieces into six inch lengths.


After cleaning them up with 150 grit sandpaper, I will add the tinning. (I don't know if I'm saying this right. All I'm going to do is cover the pieces with a thin coat of solder.)


First brass piece, partially tinned.


Here are all four brass pieces completely covered in solder and ready to apply to the lamp.


I am now about to solder the first two brass parts to the botton of the lamp. This section of brass will eventually make a sturdy base that will easily support the weight of the glass lamp.


The second pair of one-inch brass parts overlap the first. I will solder them all together. The solder lines that connect the brass parts to each other will not be noticed once the lamp is assembled. However, the solder lines where the brass and the lamp connect will be noticeable. Keep them nice and tidy. (But don't look to closely at mine!)


This section of brass pictured above (I call it the "slip") will eventually slide into a rabbet cut into the wooden base. It will provide stability for the heavy glass but it must be fitted precisely.

After cleaning them up with 150 grit sandpaper, I took two of the twelve-inch long and two-inch wide parts and bent them in my vise. I bent each piece so that it would have two five-inch long sides and one two-inch long side. It looked like an unfinished "U" when it was all said and done.

These two pieces are "clamped" together with paper clips and centered so that there is 1/2 of an inch showing all around. I soldered the two matching pieces together. Then I tinned the upper half of the "slip" and soldered it into place.


Next time I will start on the wooden base. I have some really nice figured Walnut that I salvaged from becoming firewood!

Friday, November 21, 2008

Light cube squared.


The four sides come together at last!

I'm jazzed that I finally get to see these panels become a three-dimensional object!

The trick here is in lining up the panels to make a corner. You don't want to overlap one panel over another. That would change the dimensions of the box and might make it go out of square.

Each side that comes together to make the corner should come together equally. When it is done correctly, there will be a small square gap running the full length of the outside of the corner. That gap will be filled with a piece of copper wire.


This jig was vital for keeping the box square while I soldered. The "V" shape on the jig is 90-degrees, or "square."

Also, solder likes to run downhill when it is hot. So this jig was critical to making a decent solder bead on the outside corner.

The first panels I soldered together standing up. I tacked solder and the copper wire in about four or five places along the outside corder. I held them square with the help of my project board. After that I was able to place them in the jig above to solder the inside corner.


Here's the inside corner of two panels shown while still in the jig and after soldering.


Now you can see the outside corner and the copper wire that fills the gap.


My hands were a little shaky and I kept spilling hot solder down the sides of the panels. (Too much coffee!) This extra poster board helped keep the solder from sticking to the finished panels. (It's no fun having to re-solder an already finished panel!) However, the flux tended to render the blue tape un-sticky after awhile. This is probably the third strip of tape for this particular piece of paper. Perserverance pays!


It's starting to look like something! I'm now going to quickly cut out a pattern for the lid. I will cut the glass, copper foil the pieces and solder them into place.

At this point I really getting excited. I want to see what it looks like lit up! I haven't yet acquired the socket and cordset for the lamp works so I need to come up with something else. It needs to be compact and bright....a mini-flashlight! I bought these for my kids last Christmas. Here's what it looks like lit.


I like it! The white parts look like snow, the birds look properly colored, and it's just cool to look at!
The blue cast to the light is because of the color of the LED in the flashlight. I'll be using a different color bulb when it's all said and done.
Seeing it lit really energizes me. I still need to build the wooden base and the brass support structure, but now I'm really motivated!

Wednesday, November 12, 2008

Daily grinder.

The subject matter and the dimensions are now decided upon. As an added bonus, I was able to find all the different colors of art glass that I needed to represent the chickadees. I even found "snowy" glass for the background.


The next step is to transfer the four pencil-drawn panel images to heavier paper so that they can be cut.


The cut out pieces of each panel will be used as a template to mark the glass for cutting. I used common carbon paper, a pencil and my trusty ruler to make the transfer. Some poster board left over from one of my sons' school projects was used as the backing paper. It is stiff and durable; two great qualities for a template.

Transferring all four images at once to a single sheet of the poster board was done for the sake of convenience. Drawing and transferring images includes a different set of tools. I'll put the drawing stuff away as soon as it's done.

I don't like working with carbon paper because it can be messy. There was a small amount of excess carbon that rubbed off onto the poster board. The extra carbon may have made the templates a little messier than necessary but it didn't really interfere with the project.


In the image above you can see the poster board has several individual pieces already cut. I used copper foil shears for this job. The shears don't merely cut like regular scissors, they actually remove a sliver of paper in between the pieces. This additional space makes room for the copper foil that will eventually surround each piece of glass.

Notice that each piece is already labeled. Did you see that each template has a directional arrow? The arrow signifies the eventual orientation of the glass. Most of the art glass I use has a pattern that flows in a certain direction. I want the streaks in the glass to flow in the proper direction in my panel. The arrows on individual template pieces remind me which direction they are supposed to go.


Now you can see my glass cutting board is getting busy. The template for this first panel has been cut out completely and I'm beginning to mark and cut glass. I place the paper template on the the glass and outline it with an oil-based marker. I then remove the template and cut just inside the marker line. My running pliers (lower left in photo) usually takes care of the breaking.


Here, I am running a piece of glass along the grinder to clean up the edges. Every piece gets this treatment. (My other hand was removed for a clear and dramatic photograph!)


Organization is really important. (So is safety. Wear your safety glasses!) Some of these paper templates are small (smaller than I like). I place the templates in order on the board before they are cut. After they are cut they go into a little plastic baggie for safekeeping. Each baggie has its project name and panel number written on it. Save your templates and drawings! You can use them over and over. You never know when someone will want you to make them their own version of your project.


I placed my original drawing to the side of the work board. Here I can organize the glass pieces as I complete them. I can also compare the glass shape and size to make sure the fit is correct. Notice the grain direction in the glass of the bird's wing. That part of the bird would have looked funny with the streaks running in a different direction.


Now you can see my project board with the glass cut and in place. The yardsticks allow me to contain the pieces within the finished size of the panel. I will not move these sticks until all four panels are constructed.

The project board is simply a piece of 3/4" birch plywood. I've squared-up and nailed some scrap lumber at one corner. Making sure your project is square is really important. It is especially important when you have four panels that need to solder together later.


As I begin to copper foil each piece, I find that the fit is getting tighter and tighter. Some pieces need additional grinding for a proper fit. If I take away too much it will make gaps between the pieces which are harder to cover in solder.

Friday, November 7, 2008

Scritch scratch I was making a lamp.

An unusual peace has descended upon the shop. The table saw has been quiet for several days now. There is still work being done. But replacing the saw's loud grumbling is a soft, gritty scratching noise. A sound that I can only describe as what a fistful of gravel would sound like when scraped across a chalkboard. Anyone who has ever cut glass will know the sound well.

In a previous post I described my last stained glass project, a rendering of my antique hand plane. In that post I only touched on some of the techniques that I used to create the stained glass panel. This time, I've taken more photographs and will explain in more detail how this project will come together.

So, what is the new project? My new project is a lamp. Notice, I didn't say lampshade. There are plenty of stained glass lampshades out there. They are attractive and many are complementary with Arts & Crafts design. But this lamp is altogether different from anything I had seen before. You'll see what I mean as the lamp comes together.

Before I get ahead of myself, let me give credit where credit is due. The original piece that inspired this project was created by an extremely talented glass artist named Ichiro Tashiro of Japan. I borrowed heavily from Mr. Tashiro's work in the making of this lamp.

Let's start with the images. This lamp has four glass sides and a glass top. The glass portion will sit snugly in a wooden base. The four glass sides will have images. In this case I chose birds.


These are black-capped chickadees. I chose them for this project because they are common all across the northern part of the United States, and because they are active and cute.

Using a common ink-jet printer, I sized and printed black and white versions of these photographs. Now is a good time to talk about size. I had already decided how large the lamp and its base was going to be. In this case, I wanted each panel to be 6 inches wide. I also wanted the wooden base to be a square of 6 inches. Using the "golden rectangle" ratio of 1:1.6, I made the glass panel height 9.75 inches. (6 x 1.6 = 9.6) OK. So I rounded up a little on the math. It will look fine, trust me.

After figuring out the specific dimensions for each glass panel I determined how large the birds should be for a pleasing design. I also chose which direction the birds would face and the layout of the branches. Only two sides of a square object can be see at one time (I'm not counting the top as a side.) Therefore, only two sides of the lamp will have a detailed image of birds. The other two sides will probably face a wall, much like I did when I misbehaved in kindergarten.

Using expert drafting equipment of a ruler, a pencil, a carpenter's square, and a sheet of paper, I was able to lay out the 6 x 9.75 inch panels. From the black and white prints I traced pencil outlines of the birds' prominent features and the twigs they are perched upon.


After making the simple pencil sketch, I went over the drawing another time with a pencil and ruler, making my lines straight. I thought the panel would look better that way. You be the judge.


Tuesday, November 4, 2008

Bonding and copper foil.

A few weeks ago, my wife and I decided to spend some quality time together. We agreed that taking lessons of some kind would be a great way to accomplish that task. We could sit by each other for three hours a week and work and talk and grow together. (Or something like that.) So she set out to come up with the subject we would learn.

I think her first idea was swing dancing. Not a chance! We were both athletes once (a long, long time ago) but dancing was never a strength for either of us. The next idea was golf. That one never got off the ground either. Finally she signed us up for stained glass class. We just recently completed the six week course and I have to say, it was time well spent for both of us.

The photo above is a product of that class and my very first attempt at stained glass. It is a rendering of my 1929 Stanley Bailey No. 4 hand plane. Now, I had many pre-made designs available to me at the stained glass store. There were flowers and plants and puppies and dragonflies. I'm sorry, but I could not force myself to choose one. None of those designs had enough... testosterone. I ended up making my own design. Here's how I did it:


First, I took a photo of the item to be immortalized in glass. I set the plane on a pine board that was propped up on my workbench. I actually took several photos, but this one appealed to me the most.


Using a typical ink-jet printer, enlarged the photo and printed it out (in black and white) in sections on six 8.5" x 11" pages. I then cut out and taped the pages together to create what you see in the photo above.

The next step was the tricky part. I had to decide where to divide the image so that it would make sense as a stained glass panel. I began tracing around the obvious parts, like the handles and the metal base. I decided that some of the larger pieces should be "broken" into smaller ones. (Remember, I have no stained glass experience at this point, so what do I know!?) You can see some of those lines in the photo.

I then put carbon paper onto poster board and placed the photograph on top of the carbon paper. I traced the lines I made earlier and the carbon paper transferred them to the poster board. Once the outlines were clear on the poster board I used copper foil scissors and cut out all the different pieces. These individual pieces are the templates I used to cut the glass.

We were taught to paste the poster board cut-outs to the glass and then run our glass cutters along that template. Once the "scratch" was made onto the glass, there are special pliers we used to break the glass apart. A glass grinder finished each piece.

The rest of the project was copper foiling, assembling, soldering and applying patina. There is a lot of work in a stained glass project! I'll show you some of these steps in more detail in a later post.

In the end I think it worked well. Some of the glass parts were difficult to make, but not impossible. It was definitely a challenging project but I would do it again the same way.